[introduction] great pressure vessel defects on equipment performance and safety of the accident, but too late to regret. What are the disadvantages of pressure vessels? Do you know how to avoid it?
Common defects in pressure vessels
1, crack CRACK

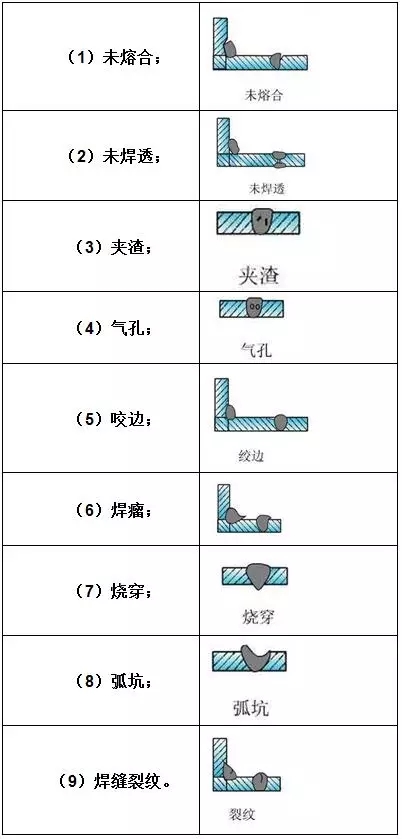
2, welding defects WELDING DEFECTS

3, other defects DEFECTS OTHER

(1) delamination defect.
(2) surface opening defect.
(3) scour defect.
(4) corrosion defects.
(5) deformation defects.
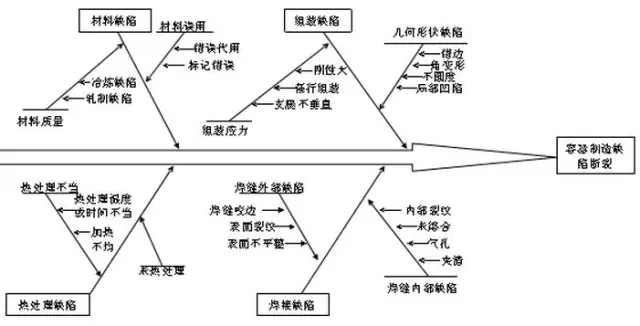
The influence of pressure vessel manufacturing defects on its safety
Another vessel defects generated during the manufacturing process is not caused by the connection shell geometry, such as uneven, joint angle deformation etc.. The stress of all kinds of revolving shells under internal pressure is related to the radius of curvature.
When the two kinds of shells with different radius of curvature are connected together, the deformation is different due to different stresses. However, they are bound to each other, and thus the shear force and bending moment are caused at the junction, resulting in additional bending stress of the shell, resulting in excessive local stress.
Generally speaking, the diameter of large and small depth of the depression, the change of geometry is relatively moderate, the impact is small. The uneven head produced in the container in the manufacturing process, are generally mild changes.
The influence of internal stress
In general, the greater the amount of cold deformation, the greater the internal stress. The residual stress on the vessel shell, even if it does not produce cracks, will aggravate the fatigue cracking and stress corrosion cracking of the pressure vessel.
How to determine the pressure of the airtight test of chemical vessel

The tightness test of chemical container is mainly to check the tightness of the container. The air pressure strength test and the qualified container can not be used for the air tightness test.
Air tightness test must be carried out after the hydraulic pressure test, the test pressure is 1.05 times the design pressure. During the test, the pressure should be increased slowly, after the specified test pressure, the pressure is 10min, and then the design pressure is reduced.
Small containers can also be immersed in water inspection. If there is leakage, repair the hydraulic test and air tightness test.
Low, medium and high pressure vessels in the internal and external conditions of the content inspection
1, external inspection
(1) ontology, interface position, pressure vessel welding joint crack, overheating, deformation and leakage; leak detection, signal hole leakage, leakage, leak pipe dredge.
(2) the corrosion of the outer surface, the insulation layer is damaged, falling off, wet and cold running; the abnormal vibration, sound and mutual friction between adjacent pipes or components.
(3) damage to support or support, foundation sinking, inclination, cracking, the integrity of the fastening bolts.
(4) to check whether the safety accessories meet the requirements.
2, structural inspection (focus on the following parts)
(1) the connection between the cylinder body and the head, corner joint, lap joint and unreasonable arrangement of welding.
(2) a square hole, manhole, manhole and reinforcement.
(3) head, bearing, bearing.
(4) flange and outfall.
3, the geometric inspection can be carried out according to the original information to check the following
(1) the longitudinal and circumferential weld seam misalignment, edge angle, weld height, fillet weld thickness and fillet size, and unreasonable weld.
(2) the same section of the maximum diameter and the minimum diameter, head surface, straight edge height and vertical fold, unequal thickness (forging) pieces of butt joint without cutting thin over Super bad.
(3) the verticality of vertical pressure vessel and spherical pressure vessel pillar.
(4) the gap between adjacent steel strips of the ribbon wound pressure vessel.
4, surface defect inspection
(1) determine the depth, diameter, length and distribution of corrosion and mechanical damage, and plotting record. The cause of abnormal corrosion shall be identified.
(2) surface crack.
1) the internal surface of the weld (including near seam area), should be naked eye or 5~10 times the magnifying glass to check the crack
In case of any of the following circumstances, the surface inspection shall not be less than 20% of the weld length:
Material strength grade B > 540MPa; Cr-Mo steel:
Austenitic stainless steel surfacing layer.
Stress corrosion cracking.
Other suspected welds.
Such as the discovery of cracks, the inspector should according to the potential defects that may exist, to determine the percentage of increase in surface flaw detection.
If the cracks are still found, the surface inspection of all welds shall be carried out. At the same time, it is necessary to further examine the possible crack defects on the weld surface.
The inner surface of the weld has been part of the crack, the corresponding external surface of the weld should be spot checks.
2) the stress concentrated parts, deformation parts, dissimilar steel welding parts, fixture, welding arc damage and easy to trace crack position, should focus on checking.
3) intergranular corrosion tendency, the use of metallographic examination or hammer test. Check the hammer, the hammer with 0.5 ~ 1.0kg, on both sides of the weld or other parts.
4) the surface of the welded joint of the steel belt of the belt type pressure vessel should be checked.
(3) weld seam inspection.
(4) other welding sensitive materials shall also be checked for possible weld toe cracks.
Determination of deformation and deformation dimensions, possible other defects and causes of deformation.
5, wall thickness measurement
(1) the location of the measuring point shall be representative and shall be sufficient to determine the number of points.
Should be recorded after plotting. To determine the location of the point, the following parts should generally be selected:
1) frequent fluctuations in liquid level;
2) corrosion and erosion;
3) in the process of forming, the thickness of the wall is thinned and the part of the deformation is used;
4) check the surface defects, found suspicious parts.
(2) when using ultrasonic thickness gauge to measure the thickness of the wall, if there is an interlayer defect in the parent material, the measuring points should be added or the ultrasonic flaw detector is used to find out the distribution of the interlayer and the inclination of the surface of the base material. DeterminationWhen the wall thickness of the pressure vessel in the hydrogen medium is found, the possibility of hydrogen corrosion should be considered if the wall thickness increases.
6, material
(1) the types and grades of the main pressure components shall be identified. The material is unknown, for steel pressure vessels without special requirements, allowed according to the lower limit value of material strength of Q235 steel, strength check. For the pressure vessel tank, tanker and have special requirements, must find out the material. For this inspection has been carried out, and has made a clear treatment, no longer repeat inspection.
(2) whether or not the material of the main pressure components is deteriorated, can be determined according to the specific conditions, such as chemical analysis, hardness measurement, spectral analysis, metallographic examination and so on.
7. Pressure vessel with cover
(1) whether or not the insulation layer should be removed shall be determined according to the operating conditions and the external environment. One of the following circumstances, can not remove the insulation layer.
1) all welds on the weld surface have been inspected and qualified;
2) local representative spot inspection, no cracks and other defects found;
3) the external environment does not intrude or run cold;
4) external environment with reliable corrosion protection measures;
5) with similar experience;
6) the inspector deems unnecessary.
(2) there is a pressure vessel metal liner, such as lining corrosion, penetrating cracks, local bulging or sag, check the hole outflow medium should be partially or completely removed lining layer, identify the corrosion status of body or other defects.
(3) austenitic stainless steel welding lining, such as cracking, peeling, found lining damage and fall off. Lined for non metallic materials, such as found lining damage, cracked or off, or in the operation of the body wall temperature is abnormal, should be removed or local lining, identify the corrosion condition of body or other defects.
(4) for the inner and outer surfaces of the overlay, should press the 2 and 4 inspection within the surface, if there are serious defects such as crack, should be in the outer surface of the partial or total removal of cover test.
8, weld defects inspection
(1) for any of the following circumstances, it is generally necessary to conduct radiographic testing or ultrasonic flaw detection and, if necessary, examine each other.
1) in weld manufacturing more than two times in the process of using the weld repair or repair welding of the site;
2) inspection of the weld surface cracks found that the need for the inspection of weld defects;
3) the location of the weld seam with the wrong edge and edge angle;
4) in the use of the occurrence of weld leakage and the extension of both ends of the site;
5) user requirements or the inspector deems it necessary parts. This inspection has been carried out, and again, if no abnormal circumstances, generally no longer review.
(2) the number of test methods and inspection, determined by the inspectors according to the specific situation.
9, safety accessories check
Check the safety accessories in accordance with the relevant safety regulations.
10, fasteners inspection
The high-pressure bolts should be cleaned one by one. Inspection of the damage and cracks, if necessary, the surface should be non-destructive testing, should focus on checking the thread and the transition part of the non circular crack.
Low, medium and high pressure vessel internal and external safety level inspection cycle

1, external inspection
Refers to the professional personnel in the pressure vessel in the regular online inspection, at least once a year.
2, internal and external inspection
Refers to the professional inspection personnel, in the pressure vessel downtime inspection, the period is divided into: safety level for 1~3 level, every 6 years at least once; safety level for 3~4 level, every 3 years at least once.
3, pressure test
A hydraulic test or pneumatic test that exceeds the maximum working pressure when the pressure vessel is to be stopped, and the cycle is at least once every 10 years. External inspection and internal and external inspection content and safety level of the provisions, see "in the use of pressure vessel inspection procedures".
In the following circumstances, the internal and external inspection period shall be shortened properly:
(1) the corrosion of the medium to the pressure vessel material is not clear, the corrosion rate of the material to the material is greater than 0.25mm/a, and the corrosion data determined by the designer is not accurate;
(2) the material in the manufacture of poor welding performance, has repeatedly repaired;
(3) for the first time;
(4) the use of poor conditions, low management level;
(5) for a period of more than 15 years, it is confirmed that it cannot be used according to the normal inspection cycle;
(6) think we should shorten the inspector.
The internal and external inspection period shall be appropriately extended to the pressure vessel in one of the following circumstances:
(1) non metallic lining is in good condition, but the inspection period shall not exceed 9 years;
(2) the corrosion rate of the medium to the material is less than 0.1mm/a or the pressure vessel with a reliable corrosion resistant metal lining shall be confirmed to meet the original requirements through one or two internal and external inspections, but shall not exceed 10 years;
(3) reactor with catalyst and large pressure vessel equipped with filling, the regular inspection period by using the unit in accordance with the design drawings and the actual use of the situation to determine.
Causes of hot cracking in welding of pressure vessels

Hot cracks occur along the junction of the dendritic crystals in the weld metal.
The most common case is the crack in the middle of the weld along the length of the weld, sometimes in the weld between the distribution of two dendritic grains. The hot cracks are generated at the grain boundaries, which indicates that the grain boundary is a weak zone in the process of welding.
The reason of hot cracking is the existence of liquid layer in the weld, and the effect of tensile stress on the weld. The existence of liquid interlayer is the fundamental cause of hot cracking, and tensile stress is a necessary condition for hot cracking. Not in the crystallization process of late, in the solid line is dangerous temperature zone hot crack.
Near the weld metal is also heated to a high temperature (slightly below the melting point), if the parent metal near the weld grain there are impurities or low melting point eutectic, under the action of heat in the melting, the liquid layer formed in the grain boundaries, the cooling process of the tensile stress will make close seam district heat crack. There is an interdependent relationship between the hot crack in the weld seam and the hot crack in the near crack zone, and the hot crack in the near seam region may be the continuation of the hot crack of the weld seam, and may be the hot crack of the weld seamOrigin.
The cause of the notch effect of brittle fracture of high pressure vessel

The state of the notch and its small end material is an important factor in determining whether a member is in a brittle state, and many of the brittle failures begin at the end of the notch or crack.
The reason is that when the tensile component gap exists (RIP), due to the discontinuity of transverse tensile stress is > can not spread to crack; crack load is added to the section area, a small area is to the end of the crack, resulting in a high local concentration the stress and strain in the.
Of course, the longer the crack, the greater the local stress and strain. The local stress at the crack tip increases with the increase of applied stress, and the yield strength of the material can be reached quickly.
In close proximity to the material crack, tensile stress in the direction is not, this material will prevent crack tip deformation of small volume of metal, two times of stress this constraint will produce two other directions, the end of three to the tensile stress of small volume of material in the crack, the three to be stress does not allow thickness shrinkage or deformation, the plane strain state.
According to the third strength theory, when the three principal stress maximum and minimum principal stress stress is tensile stress, and the maximum principal stress can exceed the material yield tensile stress, which is due to gap, gap in end of the small volume of material to produce a three tensile stress system. It improves the yield stress, but also reduces the ductility, so under certain conditions of brittle failure.
Process equipment network release, please indicate the source.
